🤖 Create SMPLH Fit
This section guides you through creating a fit between SMPL+H human body parameters and your robot's skeleton. This fitting process is crucial for transferring human motion data to robot controls, establishing the correspondence between human joints and robot links.
We've added one-click startup script support for this process in our new GBC_MUJICA project! For a streamlined experience, check out the automated scripts at:
https://github.com/sjtu-mvasl-robotics/GBC_MUJICA
For detailed API reference and advanced configuration options, please refer to our comprehensive documentation in the API References → create_smplh section.
📋 What This Process Achieves
The SMPLH fitting process optimizes three key parameter sets:
- 🧬 Beta Parameters (16-dimensional): Shape parameters that define body morphology
- 🎨 DMPL Parameters (8-dimensional): Surface deformation parameters for realistic skin
- 📏 Scale Factor (1-dimensional): Scaling to match robot size
1. 🔧 Prerequisites and Verification
Before starting the fitting process, ensure all required data is properly configured from the Installation section.
Step 1: Verify Forward Kinematics
First, test that your robot's URDF can be loaded correctly:
from GBC.utils.base.base_fk import RobotKinematics as FK

# Initialize forward kinematics
device = "cuda"  # or "cpu"
urdf_path = "/path/to/your/robot.urdf"

fk = FK(urdf_path, device=device)
print(f"✅ Successfully loaded URDF: {urdf_path}")
Step 2: Validate Kinematic Tree
Verify the kinematic tree is complete and functional:
# Test the kinematic tree structure
try:
    fk.set_target_links(fk.get_dof_related_link_names())
    print("✅ Kinematic tree validation successful")
    print(f"📊 DOF count: {fk.num_dofs}")
    print(f"🔗 Available links: {len(fk.get_dof_related_link_names())}")
except Exception as e:
    print(f"❌ Kinematic tree validation failed: {e}")
    print("🔍 Please check your URDF file for errors")
Step 3: Visualize Your URDF
For quick URDF validation and visualization, we recommend using the excellent online tool:
🌐 URDF Visualizer: http://urdf.robotsfan.com/
Simply drag and drop your URDF file to visualize the robot structure and verify joint names.
2. 🗺️ Create Joint Mapping Table
The joint mapping table is the most critical component of this process. It defines the correspondence between SMPL+H joints and your robot's links.
Incorrect joint mapping will prevent successful motion transfer and cause training failures. Take time to verify this mapping carefully!
SMPL+H Joint Reference
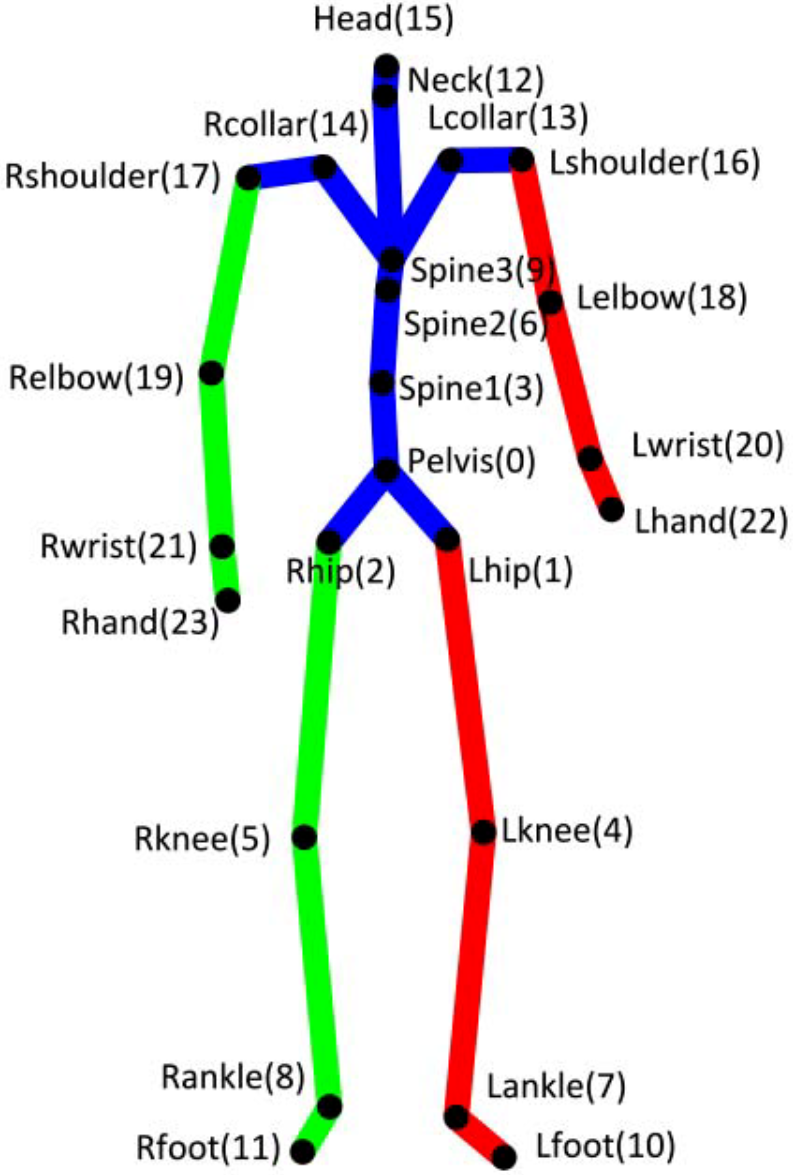
Example Mapping Configuration
# Example mapping for a humanoid robot
mapping_table = {
    # Core body joints
    'Pelvis': 'base_link',
    'L_Hip': 'left_hip_yaw_link',
    'R_Hip': 'right_hip_yaw_link',
    'L_Knee': 'left_knee_pitch_link',
    'R_Knee': 'right_knee_pitch_link',
    'L_Ankle': 'left_ankle_pitch_link',
    'R_Ankle': 'right_ankle_pitch_link',

    # Upper body joints
    'L_Shoulder': 'left_shoulder_pitch_link',
    'R_Shoulder': 'right_shoulder_pitch_link',
    'L_Elbow': 'left_elbow_pitch_link',
    'R_Elbow': 'right_elbow_pitch_link',
    'L_Wrist': 'left_wrist_roll_link',
    'R_Wrist': 'right_wrist_roll_link',

    # Optional: head and additional joints
    'Head': 'head_yaw_link',  # if your robot has a head
    'L_Toe': 'left_ankle_roll_link',  # if you want toe mapping
    'R_Toe': 'right_ankle_roll_link',
}
Joint Weight Configuration
Define importance weights for different joints during optimization:
import torch

# Higher weights = higher importance during fitting
# End effectors typically get higher weights
joint_weights = torch.tensor([
    1.0,  # Pelvis - base reference
    1.0,  # L_Hip - structural
    1.0,  # R_Hip - structural
    1.5,  # L_Knee - important for leg kinematics
    1.5,  # R_Knee - important for leg kinematics
    4.0,  # L_Ankle - end effector, high precision needed
    4.0,  # R_Ankle - end effector, high precision needed
    1.0,  # L_Shoulder - structural
    1.0,  # R_Shoulder - structural
    1.5,  # L_Elbow - important for arm kinematics
    1.5,  # R_Elbow - important for arm kinematics
    2.0,  # L_Wrist - end effector, precision needed
    2.0,  # R_Wrist - end effector, precision needed
], device=device)
3. 🔄 Configure Pose Alignments
This step aligns SMPL+H and robot joint orientations for accurate fitting.
Zero Pose Rotation Map
Define rotations to align SMPL+H joints with your robot's zero position:
import numpy as np

# Rotation map: SMPL+H joint name -> [x, y, z] Euler angles in radians
rotation_map = {
    'L_Shoulder': [0, 0, np.pi / 10],    # Slight outward rotation
    'R_Shoulder': [0, 0, -np.pi / 10],   # Slight outward rotation
    'L_Elbow': [0, np.pi / 2, 0],        # 90-degree elbow bend
    'R_Elbow': [0, -np.pi / 2, 0],       # 90-degree elbow bend
}
T-Pose Action Configuration
Define robot joint actions to achieve T-pose (arms extended horizontally):
# Create T-pose action vector
t_pose_action = torch.zeros(fk.num_dofs, device=device)
dof_names = fk.get_dof_names()

# Example T-pose configuration
t_pose_configs = {
    'left_shoulder_roll': np.pi / 2,     # Left arm horizontal
    'right_shoulder_roll': -np.pi / 2,   # Right arm horizontal
    'left_elbow_pitch': 0,               # Straight arm
    'right_elbow_pitch': 0,              # Straight arm
}

# Apply T-pose configurations
for joint_name, angle in t_pose_configs.items():
    if joint_name in dof_names:
        t_pose_action[dof_names.index(joint_name)] = angle
    else:
        print(f"⚠️ Warning: Joint '{joint_name}' not found in DOF names")
Additional Fitting Poses (Optional)
For improved fitting accuracy, add extra poses:
# Additional poses for better fitting
additional_fitting_poses = [
    # Pose 1: Arms at sides
    ({
        'L_Shoulder': [0, 0, 0],
        'R_Shoulder': [0, 0, 0],
    }, torch.zeros(fk.num_dofs, device=device)),

    # Pose 2: Arms forward
    ({
        'L_Shoulder': [np.pi/3, 0, 0],
        'R_Shoulder': [np.pi/3, 0, 0],
    }, torch.tensor([0, 0, np.pi/3, np.pi/3] + [0] * (fk.num_dofs - 4), device=device))
]
4. 🏗️ Create and Run Fitter
Now create the SMPLH fitter and execute the fitting process:
from GBC.utils.data_preparation.create_smplh import SMPLHFitter

# Initialize the fitter
fitter = SMPLHFitter(
    smplh_model_path=smplh_model_path,
    dmpls_model_path=dmpls_model_path,
    urdf_path=urdf_path,
    device=device
)

# Set the critical joint mapping
fitter.set_mapping_table(mapping_table)

# Execute the fitting process
print("🚀 Starting SMPLH fitting process...")
fit_result = fitter.fit(
    max_iter=30000,
    verbose=True,
    lr=0.01,
    rotation_map=rotation_map,
    t_pose_action=t_pose_action,
    joint_weights=joint_weights,
    additional_fitting_poses=additional_fitting_poses  # Optional
)

print("✅ Fitting process completed!")
Save and Visualize Results
# Save the fitting results
save_path = "path/to/your/smplh_fit_result.pt"
fitter.save_fit_result(path=save_path)
print(f"💾 Results saved to: {save_path}")

# Visualize the results
try:
    # Interactive 3D visualization
    fitter.visualize_open3d()
    print("🎨 Interactive visualization opened")
except Exception as e:
    print(f"⚠️ 3D visualization failed: {e}")

try:
    # Mesh visualization
    fitter.visualize_fit_model()
    print("🖼️ Mesh visualization completed")
except Exception as e:
    print(f"⚠️ Mesh visualization failed: {e}")
📊 Expected Results
After successful fitting, you should see results similar to this:
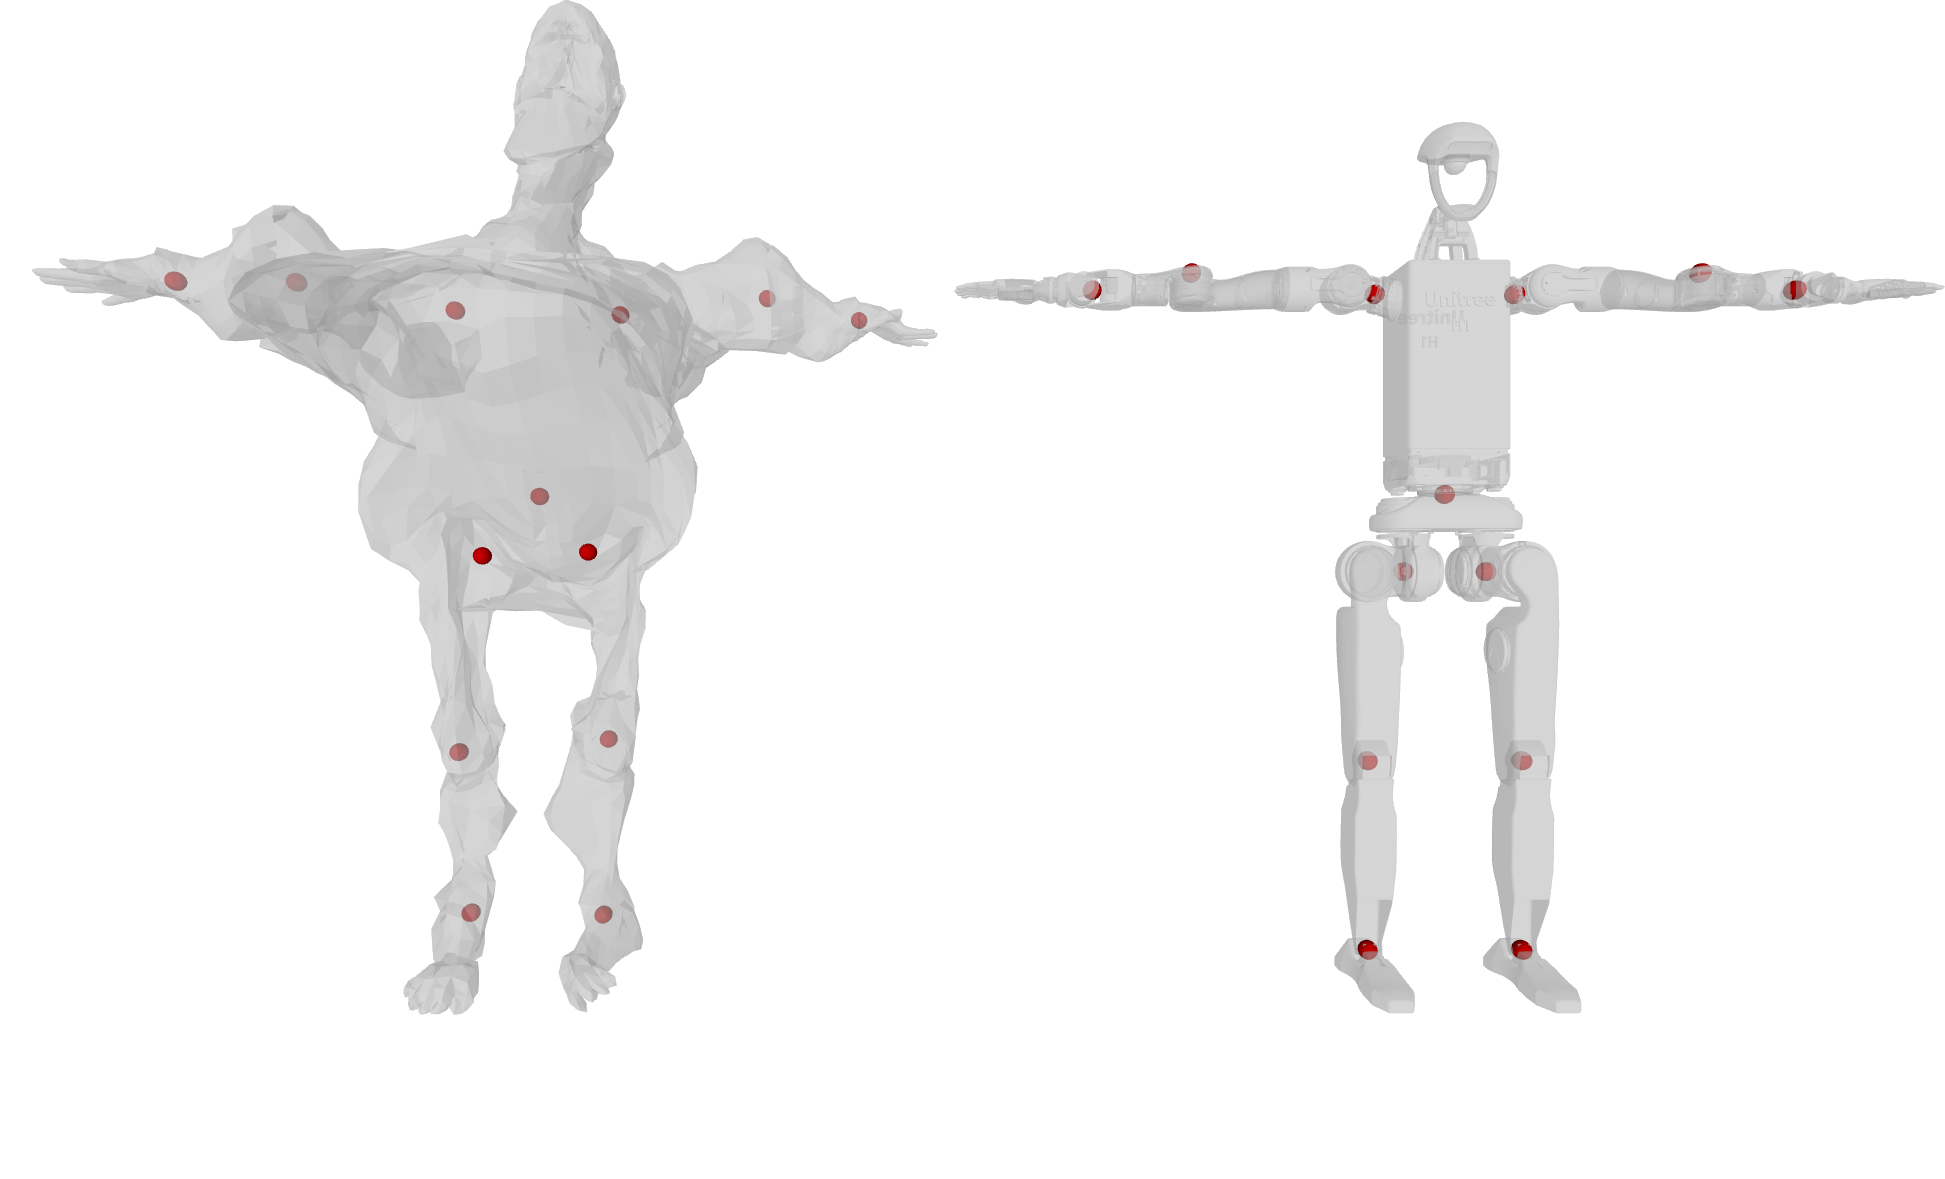
Example of successful SMPLH fitting showing alignment between human model and robot skeleton
⚖️ Performance Evaluation
Convergence Metrics
Monitor these key indicators during fitting:
# Check final loss values
print("📊 Fitting Performance:")
print(f"Final loss per pose: {fit_result.get('final_loss', 'N/A')}")
print(f"Optimization iterations: {fit_result.get('iterations', 'N/A')}")
Quality Assessment
- Loss per pose < 0.05: Excellent alignment
- Convergence within 20,000 iterations: Normal performance
- Training time: 1-2 minutes: Expected duration
- Loss per pose > 0.05: Check mapping table configuration
- No convergence after 30,000 iterations: Verify joint weights and constraints
- Extremely high initial loss: Check URDF structure and joint names
🔧 Troubleshooting
Common Issues and Solutions
Issue: High loss values (> 0.05 per pose)
# Solution: Verify mapping table
print("🔍 Debugging mapping table:")
for smplh_joint, robot_link in mapping_table.items():
    print(f"  {smplh_joint} → {robot_link}")

# Check if robot links exist in URDF
robot_links = fk.get_link_names()
for robot_link in mapping_table.values():
    if robot_link not in robot_links:
        print(f"❌ Error: '{robot_link}' not found in URDF")
Issue: Convergence problems
# Solution: Adjust learning rate and weights
fitter.fit(
    max_iter=50000,
    lr=0.005,  # Reduce learning rate
    joint_weights=joint_weights * 0.5,  # Reduce weight magnitudes
    verbose=True
)
Issue: Visualization errors
# Solution: Check system dependencies
try:
    import open3d
    import trimesh
    print("✅ Visualization dependencies available")
except ImportError as e:
    print(f"❌ Missing dependency: {e}")
    print("💡 Install with: pip install open3d trimesh")
🎯 Next Steps
Once you have successfully created your SMPLH fit:
- 📁 Save the results: Keep the
.ptfile safe for future use - 🔗 Update configuration: Add the fit path to your data configuration
- 🚀 Proceed to motion conversion: Use this fit for human motion retargeting
- 🏃♂️ Start training: Begin behavior cloning with properly aligned motion data
The SMPLH fit is now ready to enable human-to-robot motion transfer in your GBC workflows!