🚅 Train Poseformer for Retargeting
This section introduces how to train an efficient retargeting network using the SMPL+H model created in the previous section on the AMASS dataset. The trained network will support real-time motion retargeting at over 1000 FPS for arbitrary motions.
📚 Overview
The PoseFormer network uses a Vision Transformer (ViT) inspired architecture to learn the mapping from SMPL+H pose parameters to robot joint actions. After training on the AMASS dataset, this network enables:
- Real-time Performance: >1000 FPS retargeting speed
- High Accuracy: Sub-centimeter precision for most motions
- Generalization: Works with any motion capture or pose estimation input
- Extensibility: Can be integrated with real-time pose estimation libraries
For real-time motion capture applications, you can integrate with pose estimation libraries like WHAM to retarget live recorded motions or 3D animations.
For detailed implementation details and network architecture, see PoseTransformer API and PoseTransformer Trainer API.
And similar to SMPLH, we also have a one-click training script at GBC_MUJICA.
🔧 Prerequisites
Before starting the training process, ensure the following components are properly configured:
✅ Data Preparation Checklist
-
AMASS Dataset: Verify the dataset is correctly downloaded and accessible
ls -la /path/to/your/AMASS/dataset
# Should contain subdirectories like CMU, BMLmovi, KIT, etc. -
SMPL+H Fitting Results: Confirm you have the checkpoint from Create SMPL+H Fit
ls -la /path/to/smpl_fits/smpl_fits_all.pt
# Should exist and contain fitted parameters -
Data Integrity: Verify dataset files are not corrupted
python -c "
import torch
fits = torch.load('/path/to/smpl_fits/smpl_fits_all.pt')
print(f'Loaded {len(fits)} fitted sequences successfully')
"
⚙️ Configuration Setup
📋 Required Configuration Variables
Set up the essential paths and parameters for training:
from GBC.utils.data_preparation.pose_transformer_trainer import PoseFormerTrainer, LossCoefficients
from GBC.utils.base.assets import DATA_PATHS

# 1. Robot Configuration
urdf_path = "/path/to/your_robot.urdf"

# 2. Dataset Paths
dataset_path = DATA_PATHS["AMASS_PATH"]  # Or your custom AMASS path
smplh_model_path = DATA_PATHS["SMPLH_MODEL_PATH"]
dmpls_model_path = DATA_PATHS["DMPLS_MODEL_PATH"]
smpl_fits_dir = "/path/to/smpl_fits/smpl_fits_all.pt"

# 3. Joint Mapping Configuration (from create_smplh_fit.md)
mapping_table = {
    "Pelvis": "base_link",
    "L_Hip": "l_hip_yaw_link",
    "R_Hip": "r_hip_yaw_link",
    "L_Knee": "l_knee_link",
    "R_Knee": "r_knee_link",
    "L_Ankle": "l_ankle_pitch_link",
    "R_Ankle": "r_ankle_pitch_link",
    "L_Shoulder": "l_shoulder_pitch_link",
    "R_Shoulder": "r_shoulder_pitch_link",
    "L_Elbow": "l_elbow_link",
    "R_Elbow": "r_elbow_link",
    "L_Wrist": "l_wrist_roll_link",
    "R_Wrist": "r_wrist_roll_link"
    # Add your specific robot joint mappings here
}

# 4. Training Configuration
batch_size = 256
train_size = 0.8  # 80% training, 20% validation split
device = "cuda" if torch.cuda.is_available() else "cpu"
load_hands = False  # Set True if including hand joints
🪞 Setting Up Symmetry Module (Optional)
If your robot has bilateral symmetry (e.g., left and right limbs are mirror images), a symmetry module can help enforce this during training. It ensures that movements on one side are mirrored on the other, improving the realism and efficiency of the generated motions.
Also, in the paper, we posted an important loss component named symmetry loss, which ensures during training, the left and right limbs are symmetric, which is critical for humanoid robots.
Furthermore, if you want to use our latest diffusion planner, this must be implemented.
To implement symmetry is a little bit tricky, so we provide a utility class in RobotFlipLeftRight and allow python to automatically determine how to flip joints. All you need is to set up the role for python to understand how to distinguish symmetric joints defined in the URDF. Now follow this tutorial to create your flipper: Robot Flip Left Right.
🎯 Loss Coefficients Configuration
Configure the multi-component loss function weights:
# Production-tested loss coefficients
loss_coeffs = LossCoefficients(
    main_loss=5000.0,              # Primary FK distance loss
    symmetry_loss=1000.0,          # Bilateral symmetry preservation
    out_of_range_loss=1000.0,      # Joint limit violation penalty
    disturbance_base=1.0,          # Action smoothness regularization
    direct_mapping_loss=1000.0,    # Single DOF joint mapping
    bone_direction_loss=1000.0,    # Bone direction consistency
    reference_action_loss=5000.0,  # Reference pose alignment
    aux_loss=1.0                   # Auxiliary model loss
)
🏗️ Trainer Setup and Configuration
🚀 Create Trainer Instance
Initialize the PoseFormer trainer with your configuration:
# Initialize the trainer
# Initialize trainer
trainer = PoseFormerTrainer(
    urdf_path="/path/to/your_robot.urdf",
    dataset_path="your_dataset_path",
    mapping_table=mapping_table,
    smplh_model_path=DATA_PATHS.smplh_model_path,
    dmpls_model_path=DATA_PATHS.dmpls_model_path,
    smpl_fits_dir="your_smplh_fit_pt",  # From SMPL+H fitting
    batch_size=256,
    device='your_device',  # e.g., 'cuda:0'
    use_renderer=True,
    sample_steps=10, # setting it to larger value can speed up training (using less data)
    save_dir="your_save_path",
    loss_coefficients=loss_coeffs,
    use_wandb=True,
    wandb_project="pose_transformer_{}".format("your_project_name")
)
📊 Weights & Biases Setup
To monitor training progress with comprehensive logging, set up Weights & Biases:
1. Register for Weights & Biases Account
- Visit wandb.ai and create a free account
- Navigate to your user settings to find your API key
2. Configure Local Environment
# Install wandb (if not already installed)
pip install wandb

# Login with your API key
wandb login
# Enter your API key when prompted

# Verify login
wandb status
3. Configure Project Settings
# Set up experiment tracking
import wandb

# Initialize wandb project
wandb_project = "poseformer_retargeting"
wandb_run_name = f"robot_{robot_name}_experiment_{timestamp}"

# The trainer will automatically initialize wandb with these settings
# The following code is not for you to run, it is only a demo
trainer.setup_wandb(
    project=wandb_project,
    name=wandb_run_name,
    config={
        'robot_type': 'your_robot_name',
        'batch_size': batch_size,
        'loss_coefficients': loss_coefficients.__dict__,
        'mapping_joints': len(mapping_table)
    }
)
🚀 Training Execution
🎯 Start Training Process
Before running the training, ensure all configurations are set correctly.
# Setup your training configuration
from GBC.utils.data_preparation.robot_flip_left_right import YourFlipperModule # This one is critical if you want to enable symmetry
from GBC.utils.base.base_fk import RobotKinematics

flipper = YourFlipperModule()
fk = RobotKinematics(urdf_path, device=device)
flipper.prepare_flip_joint_ids(fk.get_dof_names())
trainer.set_flip_left_right(flipper)
Then, execute the training loop:
# Start training
trainer.train(
    epochs=100,
    lr=1e-4,                       # Conservative learning rate
    min_lr=1e-6,                   # Lower bound for scheduling
    warmup_epochs=10,              # Gradual warmup
    validation_interval=1,         # Validate every epoch
    criterion=torch.nn.MSELoss(),  # Standard regression loss
    save_interval=5,               # Save checkpoints every 5 epochs
    save_figs=True,                # Save validation visualizations
    apply_symmetry=True,           # Enable symmetry augmentation
    apply_noise=True,              # Enable disturbance training
    visualize=False,               # Disable real-time visualization for speed
    joint_weights=joint_weights,   # Emphasize end effectors
    disturbance_min_coeff=100.0,   # Higher disturbance for robustness
    disturbance_max_coeff=200.0,   # Strong final regularization
    load=False,                    # Train from scratch
    link_trans_offset=None         # No additional link offsets
)
📊 Monitor Training with Weights & Biases
During training, monitor your experiment progress through the wandb dashboard:

Key Metrics to Monitor:
- Training Loss: Overall loss convergence
- Validation Loss: Model generalization performance
- FK Distance: Primary retargeting accuracy metric
- Joint Violations: Safety constraint adherence
- Symmetry Loss: Bilateral movement preservation
- Learning Rate: Optimization schedule progress
Expected Training Behavior:
- Initial Phase (0-10 epochs): Rapid loss decrease
- Convergence Phase (10-50 epochs): Gradual improvement
- Fine-tuning Phase (50+ epochs): Minimal loss fluctuations
📊 Training Results Analysis
🎯 Validation Visualization
After proper configuration of visualization libraries, model fitting performance will be displayed in the figs folder of your output directory. The training process automatically generates validation plots showing:
- End-effector alignment accuracy
- Joint trajectory comparisons
- Loss convergence curves
- Symmetry preservation metrics
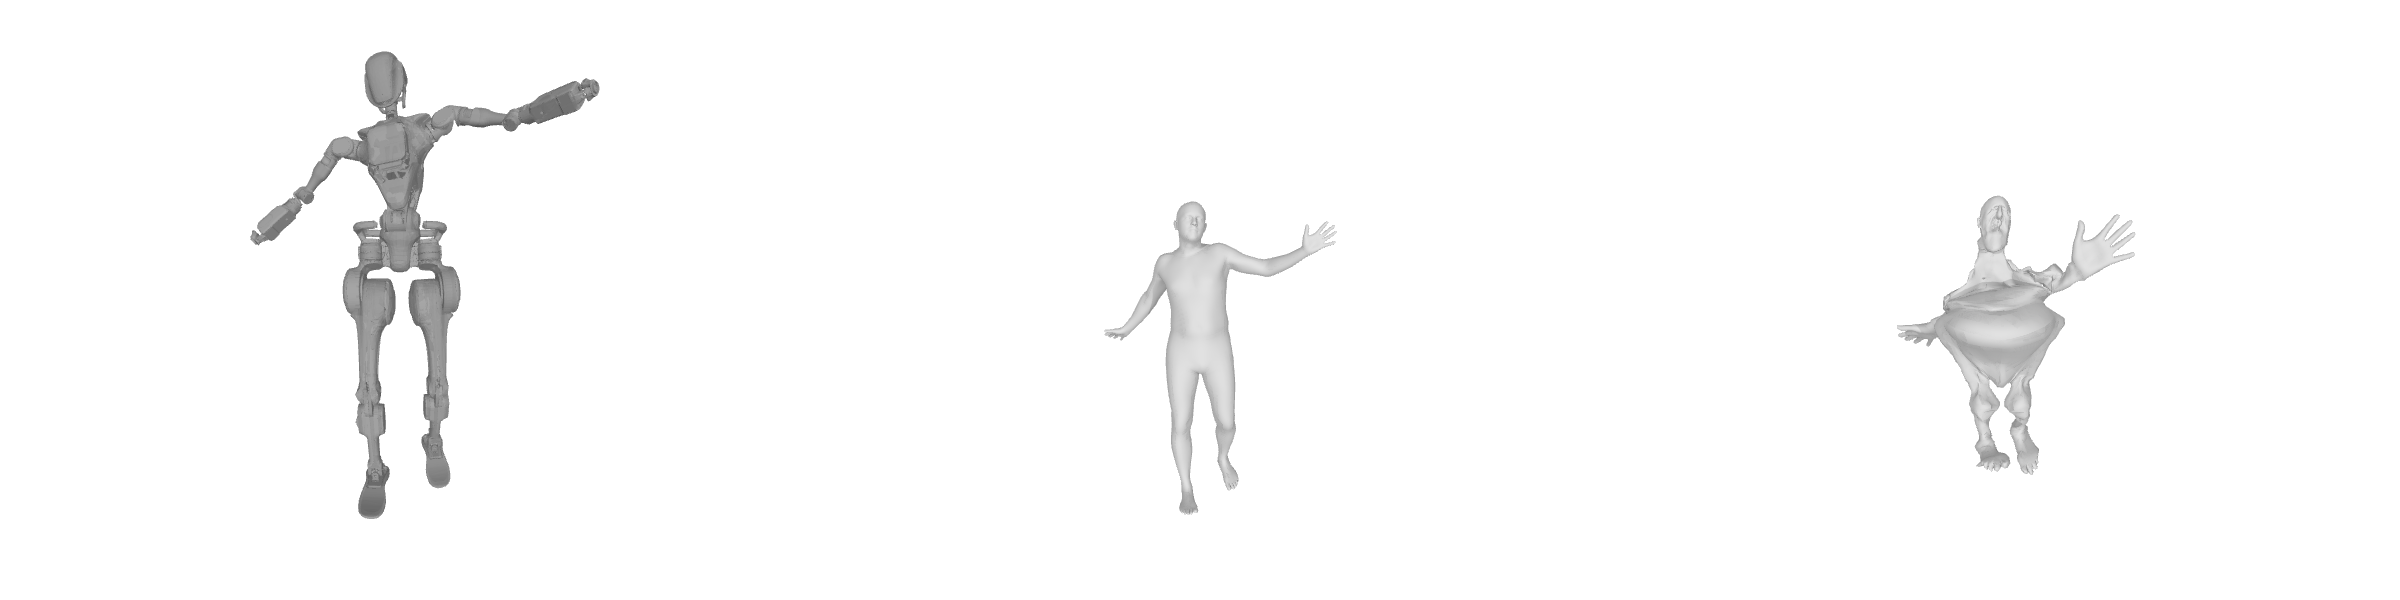
🤖 Robot-Specific Results
Here are example fitting results for different robot platforms:
Unitree G1
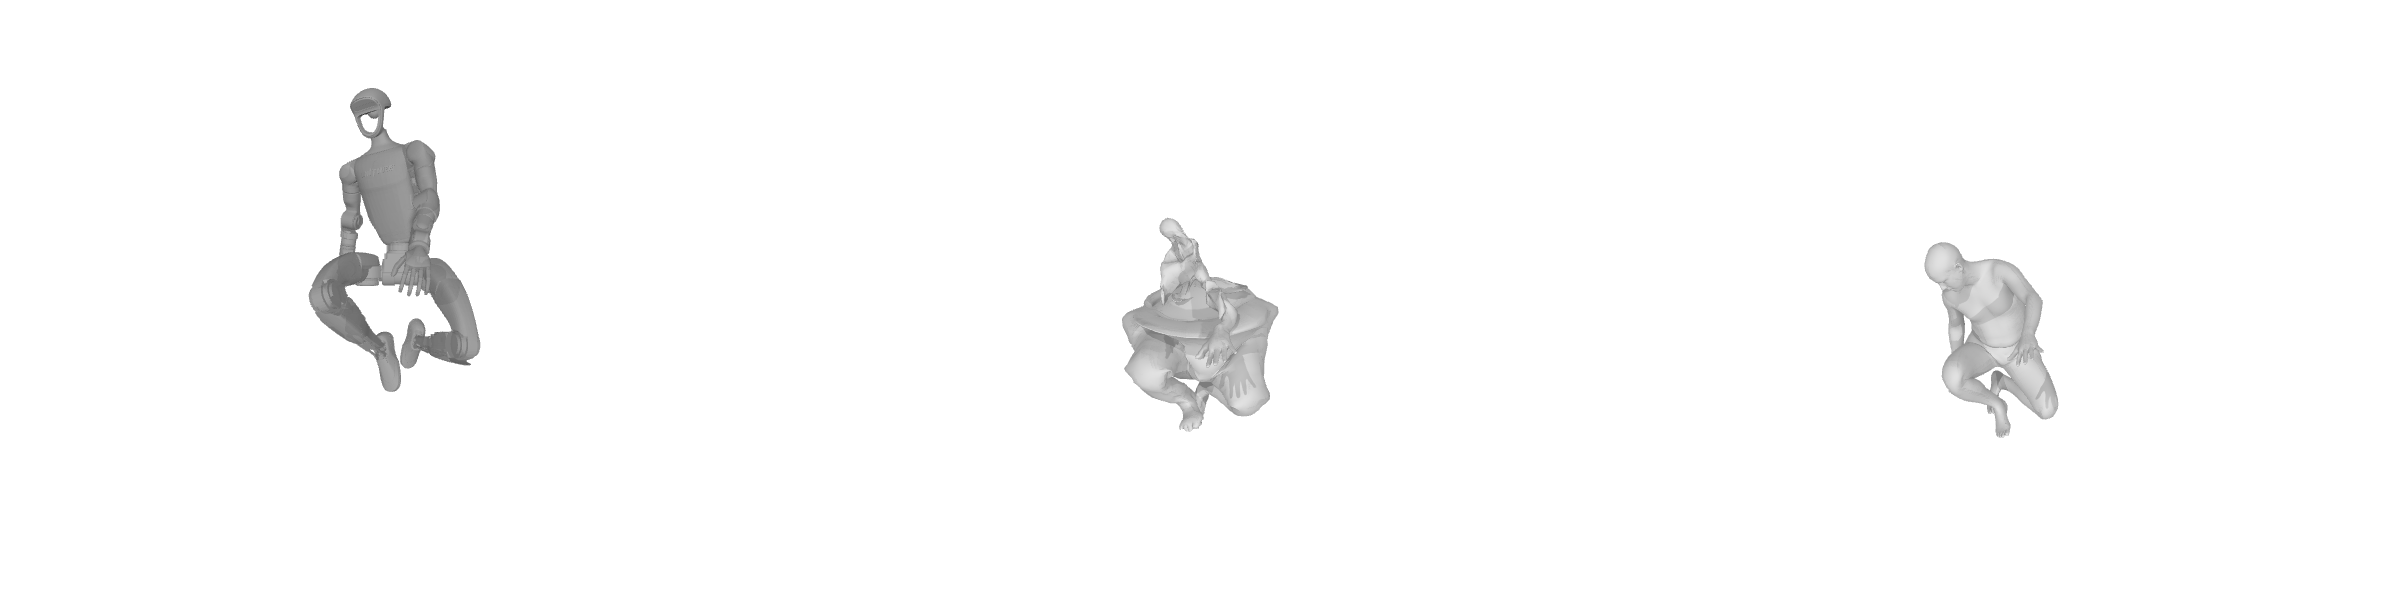
Unitree H1

Fourier GR1
📈 Performance Benchmarks
✅ Target Accuracy Metrics
For Robots with Waist Pitch DOF:
- Maximum Distance Error: < 25cm
- Average Distance Error: < 3cm
- Median Distance Error: < 2cm
For Robots without Waist Pitch DOF:
- Maximum Distance Error: < 50cm
- Average Distance Error: < 5cm
- Median Distance Error: < 2cm
Some motions in the AMASS dataset may be outside the robot's reachable workspace. Errors within these ranges are acceptable and expected for challenging poses that exceed kinematic constraints.
🎬 Video Generation and Analysis
Generate comprehensive motion videos across the AMASS dataset using the trained model:
from GBC.utils.data_preparation.render_track_videos import PoseRenderer

# Initialize renderer
renderer = PoseRenderer(
    urdf_path=urdf_path,
    dataset_path=dataset_path,
    mapping_table=mapping_table,
    smplh_model_path=smplh_model_path,
    dmpls_model_path=dmpls_model_path,
    poseformer_model_path=poseformer_model_path,
    save_path=save_path,
    device=device,
    secondary_dir="ACCAD/Female1Walking_c3d" # render all videos in this directory
)
renderer.main()
The generated videos show raw, unfiltered robot motions. For deployment applications, additional temporal filtering may be needed for smoother execution. This will be introduced in the next section.
🎯 Success Confirmation
✅ Training Completion Checklist
- Model Convergence: Validation loss plateaus with minimal fluctuation
- Accuracy Targets: Distance errors within specified ranges
- Visual Quality: Generated videos show natural, coordinated motion
- Checkpoint Saved: Final model saved and loadable
- Performance Validation: >1000 FPS inference speed confirmed
🚀 Next Steps
Congratulations! You now have a trained retargeting network capable of real-time motion transfer. This powerful tool enables:
- Real-time applications: Live motion capture retargeting
- Animation workflows: 3D animation to robot motion conversion
- Research applications: Large-scale motion analysis and generation
- Production deployment: High-frequency control loop integration
The trained PoseFormer model serves as the core component for implementing real-time motion retargeting systems, enabling seamless human-to-robot motion transfer at unprecedented speeds and accuracy.